

Kevin and I have talked about taking a sushi making class before because we love sushi so much. As it turns out, unless you’re looking to learn really intricate techniques, you can do it for free dollars (plus the cost of ingredients, of course). Thanks to a few web articles I’m now the proud semi-regular maker of my very own homemade sushi!

Total estimated cost for ingredients/tools shown plus rice and white fin not shown: $32. Plus, you will not use all of the vinegar, sriracha or miso soup packets shown, and do not need a new bamboo mat each time. Your future meals won’t even cost this much.
Homemade Sushi Ingredients
- 3 cups of Minute Rice
- Sushi Nori
- Sushi vinegar
- Sriracha mayo
- Sriracha chili sauce
- 1 avocado
- 1/2 of a cucumber
- 1/3 lb of shrimp
- 1/2 lbs of white fin
- Instant miso soup mix (optional appetizer)
Homemade Sushi Making Tools
- Wooden cutting board
- Mine is bamboo and I LOVE it, but this set of three bamboo cutting boards is even better so you have one for rice cooling, one for fish, veggies, etc.
- Bamboo sushi rolling mat and paddle
- This sushi set is a little more advanced with a few more gadgets, both work great, both are Amazon’s choice recommendations
- Glass mixing bowl
- Two sauce pans to cook rice and fish respectively
- I always recommend Caraway Cookware, for both everyday and sushi cooking
- Spatula
- Non-serrated knife to cut veggies, fish and rolls
- At minimum, you need a non-serrated knife to cut the rolls to avoid destroying them
While homemade sushi making supplies can run a bit of a longer list, you likely have some of these items home already, or easy substitutes (i.e. other cutting board, mixing bowls).
Plus, the supplies you don’t have make great gift ideas! Send this article to friends for easy birthday and holiday gift ideas.
Making Homemade Sushi
Recipe yields: Seven large sushi rolls and two bowls of instant miso soup (serves two)
Nutrition: Approximately 250 calories per full roll (plus or minus based on additives); approximately 30 calories per bowl of Miso soup
1. Prepare your rice
Prepare three cups of Minute Rice as normal. Once done, put the rice in a glass mixing bowl and add the sushi vinegar, amount needed will be outlined on the bottle you have.
Once you’ve mixed in the sushi vinegar, the rice on a large, flat surface. I got that instruction from the Nori package and didn’t quite understand it at first, but realized the rice cooled much faster that way. I highly recommend doing the same!
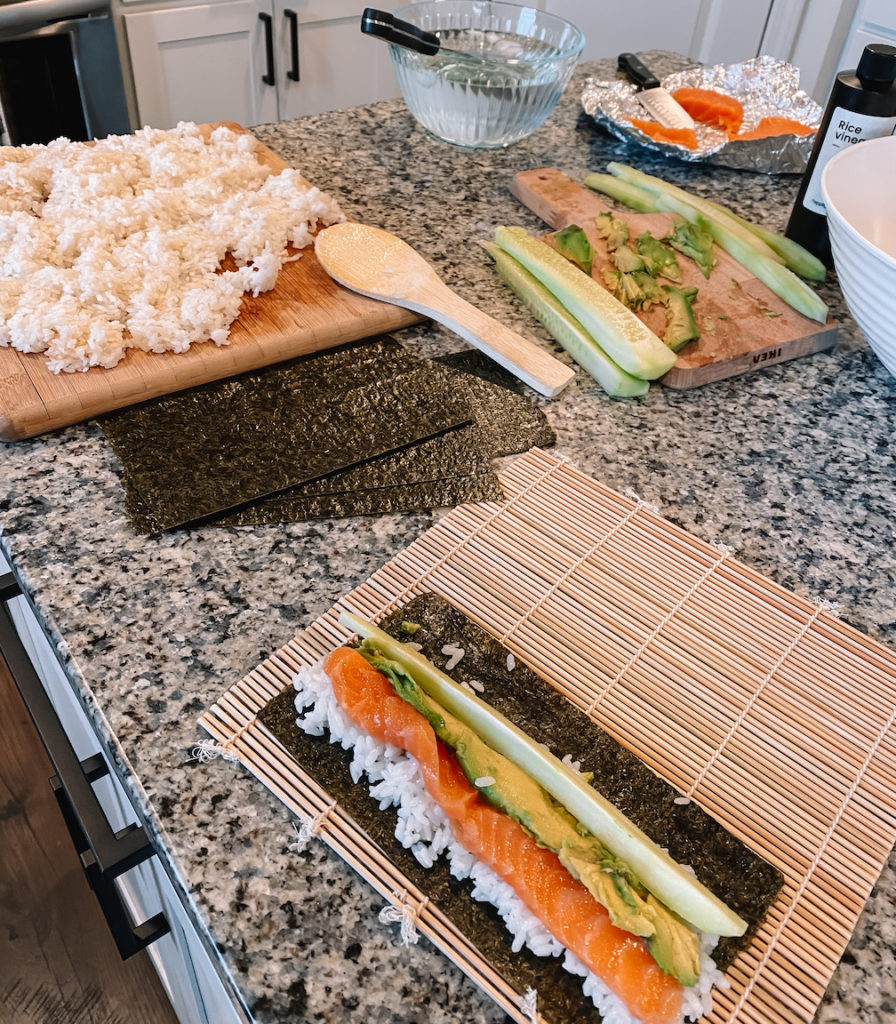
2. Cut up your homemade sushi ingredients
Cut your veggies to fit nicely in the roll horizontally (pictured above). The cucumbers are already long so cutting them is pretty easy but the avocado can be a bit tricky. They may not look the prettiest when you’re rolling it but that’s not what you see at the end and it will taste just as good, don’t harp on it.

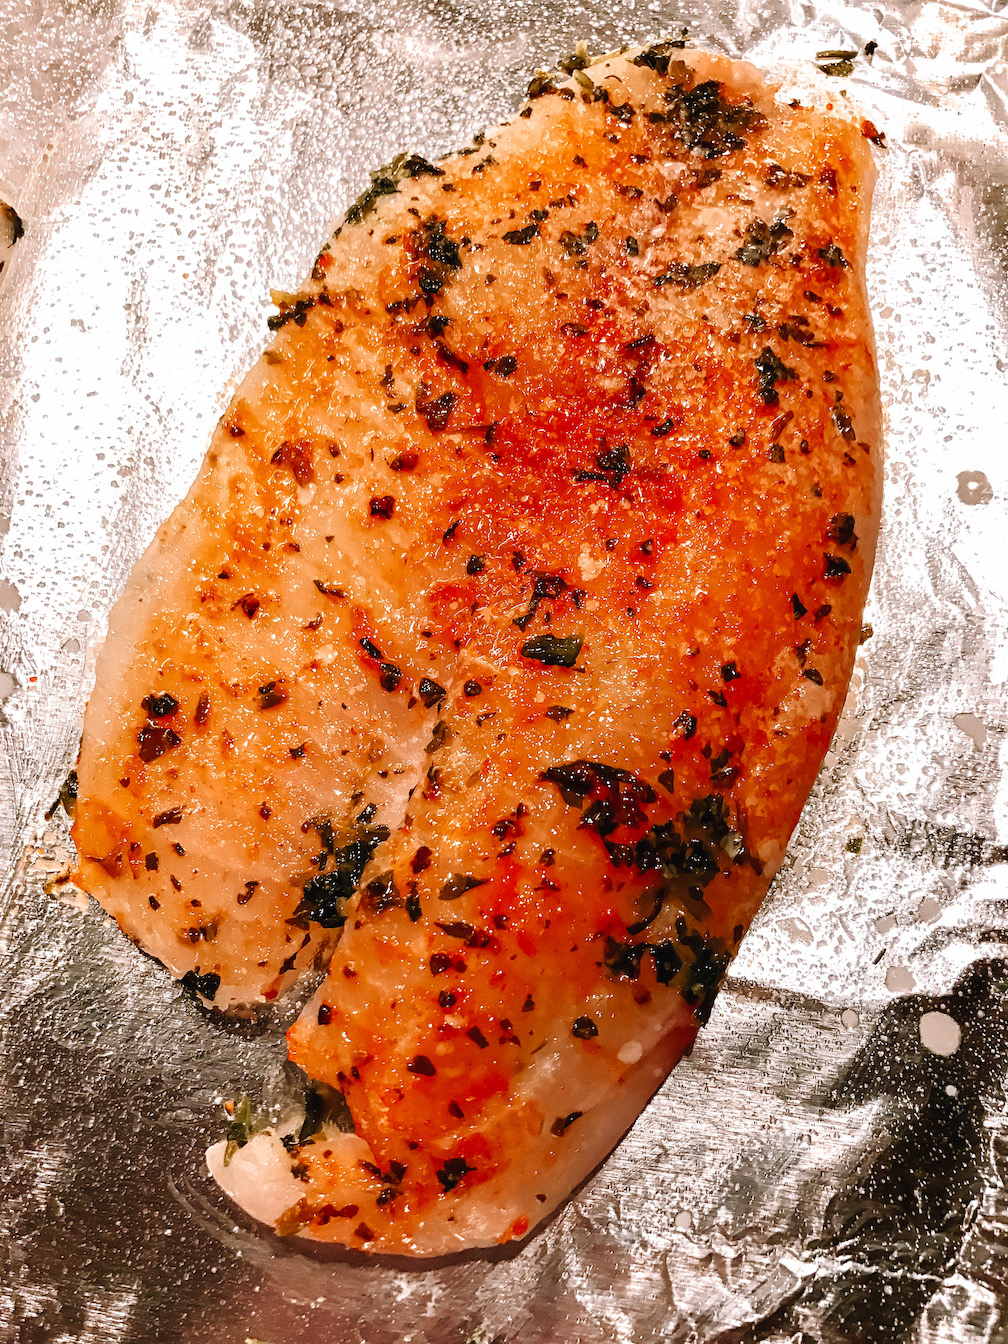
3. Cook your fish
Since my main stop for ingredients was Whole Foods, and I thought for sure they’d have sashimi but did not, I improvised. The gentleman at the seafood counter suggested trying their hot bar for the white fin since you could buy that by weight; that turned out to be a great suggestion. I also grabbed a small pre-portioned container of shrimp for some variety. I pan fried those for a few minutes, cut the shrimp in to smaller bits (optional) and shredded the white fin a bit more.
All in all, the meat cost me about $10 which is typically less than the price of one specialty roll at a sushi restaurant.
4. Rolling your homemade sushi
Follow my advice below and you’ll be pleasantly surprised how easy this part is.
Have a bowl of cold salt water on deck.
Dip your fingers in before handling the rice, this helps the grains not stick to your fingers when adding it to the Nori. Keep the bowl nearby, because it will come in handy when cutting the rolls later.
Don’t pile on ingredients.
This isn’t Chipotle, less is more. Your rice really needs to hug the Nori sheet and shouldn’t be layered more than a grain or two high. The other ingredients should lay alongside one another, not stacked in a pile.

Leave room at the top of the Nori.
You need 1.5-2 inches to seal the roll at the end, so don’t cover the entire sheet with rice (even the above is a bit too much, but these Nori were far too small, the ones I linked are bigger and easier to work with). For easiest rolling, make the farther side of the Nori where you end the roll (see above).
Wait until you’re ready to roll before dampening the Nori.
To seal your roll, your Nori packaging will mention wetting the bare end of your Nori. Do NOT wet until right before or during rolling. It’ll curl and become useless. Use your fingers to dab a little water on and seal the ends of the Nori together. Then, gently squeeze the wrapped roll in the bamboo mat to ensure a firm seal.

Lay the rolled Nori seam side down.
The weight of the roll will further to seal the Nori once you’re done rolling. Continue with your other rolls, then cut them in the order you rolled them to give each roll the most time possible between rolling and cutting to make a firm seal.
5. Cutting your homemade sushi
Use a sharp, non-serrated knife to cut the rolls. Since Nori and sushi are delicate, you don’t want to come at it with a big, toothy knife. My mom got us a nice knife set from Chicago Cutlery that had a non-serrated knife like this and it worked wonderfully. Dip the knife you use to cut the pieces into the cold salt water bowl, shaking off excess water afterwards. This keeps the ingredients from sticking to the knife as much. I did this before every other roll or until I felt like it was starting to stick again.
6. Serving your sushi and meal
Once all the rolls are cut into pieces you’re pretty much done aside from any toppings you want to add, and don’t forget the wasabi and ginger if you’re a fan! Place the rolls on your final serving dishes before topping for easiest transport. These black sushi plates are very similar to mine and come in a four pack on Amazon.

You’ll see in the final presentation photo, but I also have matching small black square dishes for the soy sauce (or whatever dippable you like for your sushi) and we use them each time, too.
Sushi Table Setting Suggestions
Here’s a complete list of the homemade sushi place setting products I’ve mentioned throughout the article.
- Miso soup bowls and spoons set
- We’ve since invested in a set and LOVE them! Especially the larger spoons.
- Reusable chop sticks
- These are incredibly similar to the ones we have and love
- Matte black ceramic sushi serving plates
- Because presentation is everything! A plain matte black plate is traditional and allows your sushi art to shine.
- Individual black sushi plates
- For you to set down the roll (or rolls) you’re currently working on.
- Soy sauce dishes
- Perfect for keeping the sauce in one spot.

In addition to the above items, I happened to have a beautiful red lacquered serving tray that I used that to serve the rolls. Bonus points for using a fun serving tray like this to serve your handcrafted sushi rolls on!
Ready to give homemade sushi a try? Share your variations with us on social media, give us a tag for a chance to be featured!
More Food and Recipes
- Homemade English Muffin Pizzas
- Easy Deviled Eggs Tutorial
- Oven Baked Buffalo Chicken Recipe
- Homemade Teriyaki Glaze for Meat or Veggies
This post contains referral/affiliate links. A small commission may be earned if products are purchased through my links. Thank you for supporting the brands that support this blog.


This post contains referral/affiliate links. A small commission may be earned if products are purchased through my links. Thank you for supporting the brands that support this blog.

